How to Decide Which Communication Rate to Use Arduino
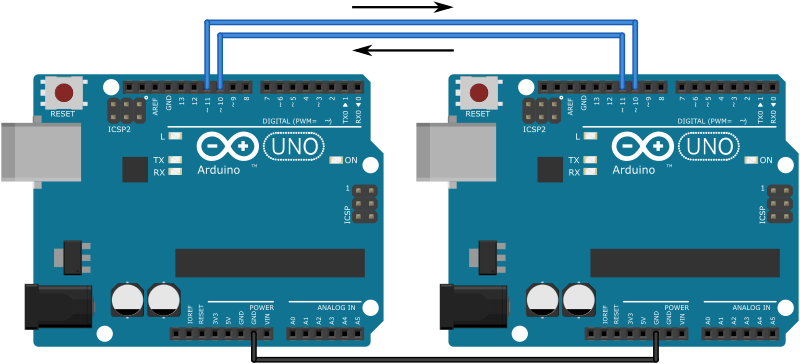
Void setup Wirebegin. Each Arduino has a tact switch and an LED.

Pin On Cool Projects
With one start bit 8 data bits and a stop bit we have a total of 10 bits.
. For the experiment we will use 9600 as our baud rate. Since Arduino is an open-source hardware any manufacturer can make Arduino boards as long as they do not use Arduinos name for these boards. Determine the level at which the SCK line should be located if there is no clock pulse.
This company sells boards similar to Arduino under the METRO brand. Select the data transfer rate. The syntax is bluetoothName Rx Tx.
One sensor has a baud rate of 115200 the other 9600. Ask Question Asked 6 years 11 months ago. There are many data transmissions between Arduino and.
2x Arduinos 2x tact switches 2x 1k resistors and LEDs. Different example codes use different baud rates without any proper explanation as to why. You can also use the SoftwareSerial Arduino library SoftwareSerialh to use other GPIO pins as Serial RX and TX lines.
Components used in this tutorial. Its a default rate for Serial Communication else you can choose from 300 600 1200 2400 4800 9600 14400 19200 28800 38400 57600 or. In order to configure the Bluetooth module the Arduino needs to send commands to it at a baud rate of 38400 baud.
Because the communication speed is not defined via this. Include byte val 0. If an Arduinos tactile switch is pressed the LED of the other Arduino will be turned on.
Delay5000Delay for 5 seconds lcdclearClears LCD display Serialbegin9600. Serial Communication between an ESP32 and an Arduino To exchange data between ESP32 and Arduino the baud rate should be the same in both programs. 53 SE RIA L O BJ ECT.
Start over from lowest value delay. The Arduino IDE is straightforward and easy to use. Moreover most Arduino boards are easy on the pocket so you dont need to break the bank to do cool projects.
Arduino 1 communicates with Arduino 2. Edmuser April 13 2021 751pm 1. I think this will create problems in the serial because I can only choose one baud rate.
Hence it is sometimes also known as TWI Two Wire Interface. As always the Arduino makes it easy for us to use the built-in UART hardware by using the serial object. The baud rate specifies how fast the data is sent over the serial line or in simple terms the speed of serial communication.
Lets consider a specific case. We are going to use Arduino d1 as TX pin and d0 as RX. Its a data rate or communication rate in bits per second.
Again the baud rate and COM port should be the same on both sides. The next step is to read the Serial and see if it contains a valid command. When using the Arduino Serial library you set the baud rate with the Serialbegin function.
The speed parameter is the baud rate that we want the UART to run. The easiest way to configure the Arduinos UART is by using the function Serialbegin speed. Adjusted by the SPIsetDataMode function.
Using this function will set the remaining UART parameters to default values Data length 8 Parity bit 1 Number of Stop BitsNone. Hence most project enthusiasts and students consider using Arduino as a microcontroller board in their projects. To start serial communication the baud rate set for arduino and computer.
With a baud rate of 9600 you can send 960 bytes per second. Communication between two Arduino - Overview. First thing we need to do is to initialize the Serial communication.
Sets Cursor at first line of Display lcdprintMicrodigisoft. When running your arduino at slower speeds you have to select a lower baudrate or the micro-controller cant keep up. Void setup lcdbegin162Initialize LCD display lcdsetCursor00.
Both the sensors seem to use the serial connection of the Arduino to log their information. Hello My understanding is that Serialbegin is for serial terminal communication between Arduino and computer while wiresetClock is for communication between Arduino and sensor device. Since 2015 Arduino is manufacturing its boards in the USA in cooperation with Adafruit Company.
What do you think. Join I2C bus void loop WirebeginTransmission 44. Set the Transmit Tx to the output pin and Receive Rx to the input pin.
When we initialize the communication we have to set the baud rate speed of the communication. Some common rates for UART are 9600 baud 11520 baud etc. Exchange Data between Arduino and ESP32 using Serial Communication In this tutorial we are going to use Arduino UNO and ESP32 dev module.
The baud rate is going to tell the sender when to send and the receiver when to sample. Begins I2C communication at. This tutorial shows how to establish a serial connection connection from an Arduino to another Arduino.
Why do you think the sensor has a baudrate. We can choose one of them depending on the communication range. In the setup function we will type.
Decide on baud rate for a project using Arduino Uno R3. Stop transmitting val. Using I2C you can transmit data at rates 100 kbits clock 100 kHz Standard Mode 400 kbits clock 400 kHz Fast Mode 1 Mbits clock 1 MHz Fast Mode Plus and.
The serial object has. The below table shows some methods and their communication range. Before you start you must determine.
If you press the webpage buttons the built-in Arduino LED. UART is called asynchronous because the communication does not depend on a synchronized clock signal between the two devices attempting to communicate with each other. How to select baud rate for Serialbegin at different wiresetClock.
Sends value byte WireendTransmission. Transmit to device number 44 0x2C Wirewrite val. Which bit should start the shift with the senior or the junior.
The communication between arduino and computer is established at a specific baud rate. Upload the Arduino code in the Arduino IDE then change the baud rate and COM port in Processing. Similarly we set the baud rate of the Bluetooth connection as well to 38400 baud.
Begins Serial Communication at 9600 baud rate Wirebegin. There are many methods to enable communication between two Arduino. Here we are declaring 9600 and implicitly it means 9600 bits per second.
The order is adjusted using the SPIsetBitOrder function. Increment value if reached 64th position max if val 64 val 0.

Serial Communication In Arduino Pija Education

Rs485 Communication Problem Programming Questions Arduino Forum
How To Do Serial Communication Between Two Boards Arduinojson 6
No comments for "How to Decide Which Communication Rate to Use Arduino"
Post a Comment